how to install glass rinser

Have you ever pulled out a glass from the dishwasher to see the remnants of yesterday’s smoothie or tried to hand wash your kid’s day (or week) old milk from their tiny cups? A glass rinser is a great solution to any sink area whether it be a home bar or a kitchen to ensure that your glasses are spotless. Luckily, the Delta® Glass Rinser is also easy to install with minimal tools. All you need are:  

  • Adjustable wrench
  • Groove joint pliers
  • Safety glasses
  • A pot or bucket to catch water
  • Towel for cleanup
  • Flashlight to help you see under the sink
delta glass rinser in use rinsing cup

1. Make sure the Delta® Glass Rinser works for your sink setup

Do you have an open hole after installing a new sink faucet? Do you have a built-in soap dispenser? If you answered yes to either of these, the glass rinser installation will be a breeze. First, make sure that the hole in your sink or countertop is far enough away from the faucet so you will have space to place the glass on the rinser. Consider what is around your sink as well. A window sill ledge or a cabinet could make it difficult to rinse taller glasses. 

If you don’t have an existing hole, you can drill into your existing sink or countertop. 

assembling glass rinser

2. Assemble the Glass Rinser

Take the mounting shank and slide it through the center of the base. Next, take the support washer and slide it onto the shank so it is flush with the underneath side of the base. If you have a stainless steel sink with a lip, you will want to place the spacer provided on the shank to keep the rinser from wobbling on the lip of the sink. Finally, grab the actuator. You can figure out the correct direction by placing it on a flat surface and making sure the arms are laying flat on the surface. Place it on the top of the base.

placing glass rinser into countertop

3. Place the rinser in the hole

Drop the rinser in the hole. It is up to you where exactly you want it, but keep in mind that the area where the water will drain out should either be flush with the sink or hanging a bit over so you don’t end up with water on your counter. 

mounting glass rinser with mounting nut

4. Mount the Glass Rinser

Now it is time to get under the sink. To tighten the rinser to your sink or countertop, you will need the mounting nut. You will thread this onto the mounting shank flat side up using your hand. There is no need to make it too snug. Once it is mounted, go back up top to make sure the placement is still where you want it. Once you get it in the correct spot, go back underneath and tighten it all the way up.

connecting water supply line

5. Connect the water supply line

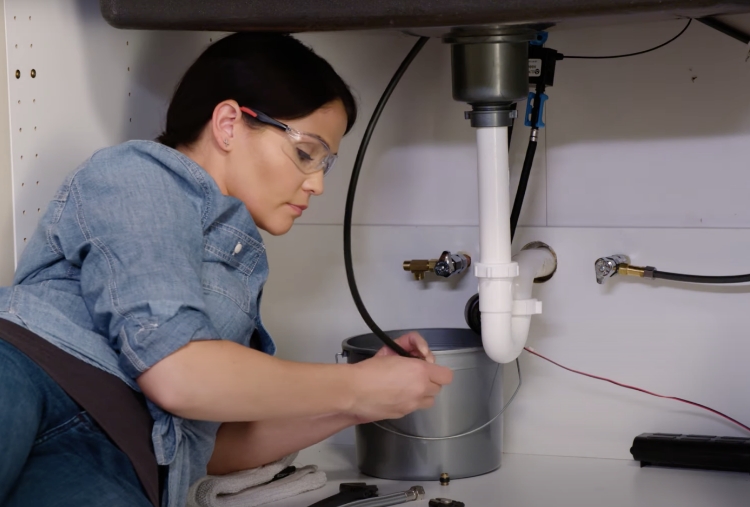
First, you want to turn off the hot and cold water supply by shutting off the valves under the sink. Now you need to decide if you want to hook your rinser up to your hot or cold pipe connection. If you are installing this into a home bar, for example, you probably want to hook it up to the cold side. If you are installing it into your kitchen, you probably want the extra cleanliness that the hot water can give you. 

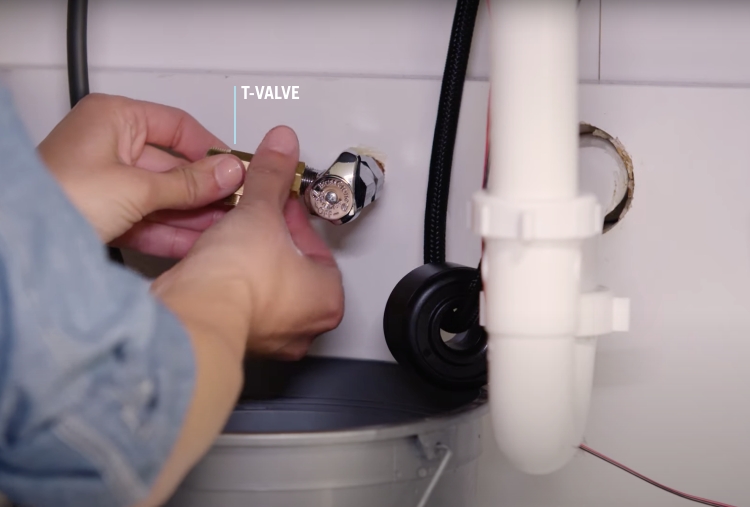
Next, you will want to unhook your supply line. Move anything that might get wet and grab your bucket or pot and towel. Take your adjustable wrench, loosen the valve and place the disconnected line into the bucket. If you have a touch faucet, make sure to take out the check valve and save it for later. Take your T-valve and screw it onto your stub out. Take your adjustable wrench and make one more revolution around to make sure you haven’t over-tightened it.

If you have a touch faucet, grab your supply line that is in the bucket and remove the check valve with your wrench. Take your check valve that you initially removed and hand tighten it onto your T. 

Now, take your pliers in one hand and hold the T to make sure it doesn’t spin while you tighten it on with your wrench. Take your supply line,  hand tighten it on and use your wrench to tighten it the rest of the way. 

connecting glass rinser line

6. Connect the Glass Rinser line

Grab the Glass Rinser line and hand connect it to the bottom of the T-valve and use your wrench to make it snug. Remember that the larger end connects to the Glass Rinser while the smaller end connects to the T-valve. Take the other end of the line and hook it to your Glass Rinser. Make sure it is placed so it won’t get tangled with anything under your sink. Hand tighten it and use your wrench to finish tightening it. 

using glass rinser to rinse wine glass

7. Turn on your water supply and check for leaks

Turn on the hot and cold water valves and look for any leaks around the T-valve and around the water supply line for the Glass Rinser. Go up top and try out the Glass Rinser to make sure there are no leaks and that it is functioning correctly.

This super easy install will add a big bang for your buck in your kitchen or home bar. If you have any questions or need help, contact Delta’s customer service at 1-800-345-DELTA.